You’ll want to create a CSS file called target-practice-flexbox.css and copy and paste the provided HTML into an HTML file.
Guidelines
Don’t change the HTML. No added classes, no added elements, nothing! You shouldn’t need to, if you write good selectors.
Use specific selectors. Your CSS should not style other parts of the page. So if this page had other <div>s, <h3>s, <button>s, and <p>s added to it, you CSS should not affect their styling.
Exact sizing doesn’t matter. If something looks a little too big, or a little too close together, don’t worry about it.
Exact colors don’t matter. But if you’re interested, check the colors section for the exact colors.
How can I select an element that doesn’t have a class?
Use a descendant selector! If I wanted to style the Buy buttons, I could use this selector:
.question-options-container button {
    /* properties go here */
}
What properties should I use?
Here are some I bet you’ll need:
background-color. There are multiple ways to set color in CSS. Hex codes (like #ffffff) are a common way.
margin. Puts space between the edge of an element and the elements around it. This is a shorthand property for margin-top, margin-right, margin-bottom and margin-left.
padding. Puts space between the edge of an element and the contents inside the element. This is a shorthand property for padding-top, padding-right, padding-bottom and padding-left.
width. Don’t be too eager to use this property. Let some elements auto calculate their width based on their contents.
border. A shorthand property for setting the border-color, border-style, and border-width
color. This sets the color of the text, not the background color.
font-family. You can set one font, or a font stack with plan A, plan B, etc.
font-size. I used rem units to change font size.
Here’s an example of what those properties could look like in action:
You probably wouldn’t use all those properties with one selector, that’s just an example.
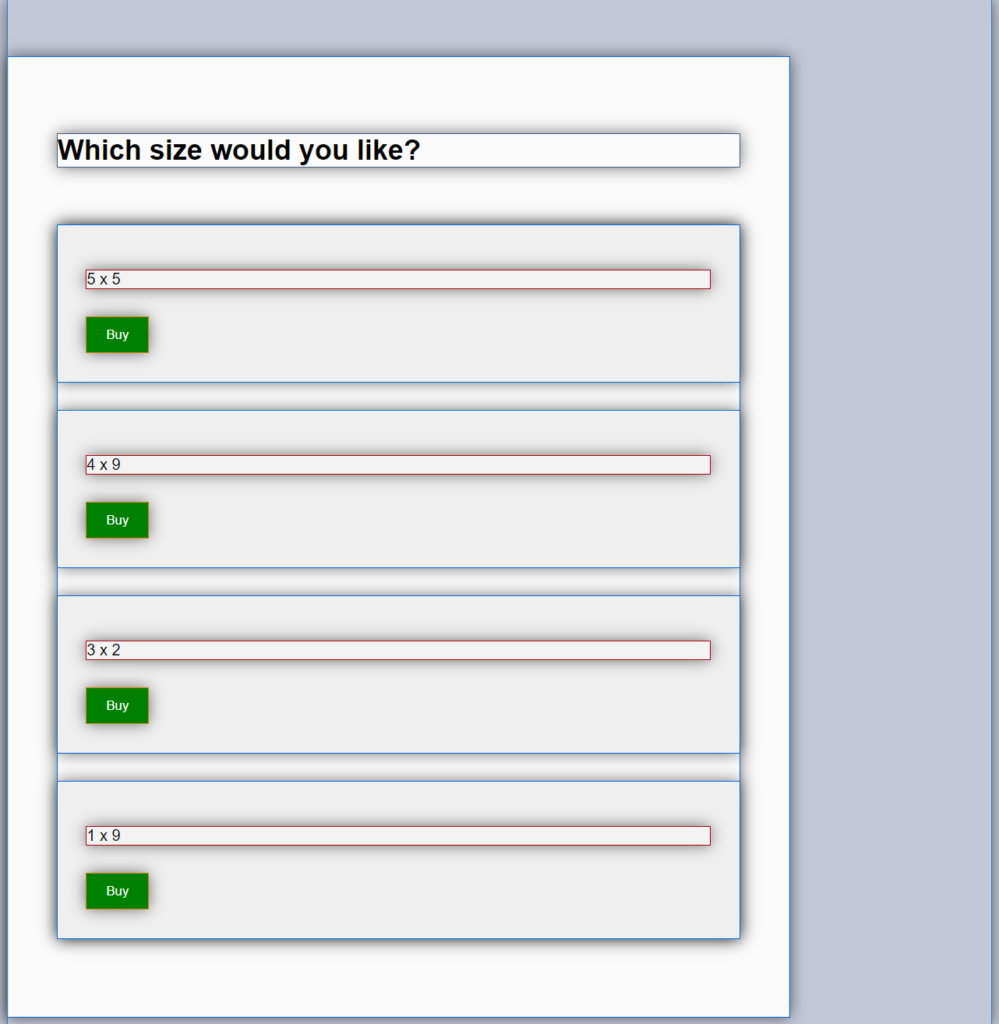
I need more help. Can I see what this looks like with all the HTML elements outlined?
Yep. Here it is with pesticide.css outlining each element:
How do I set a background color on the whole page?
Set it on the body. Something like this:
body {
    background-color: #ffffff;
}
The body is also a great place to set the text color and font.
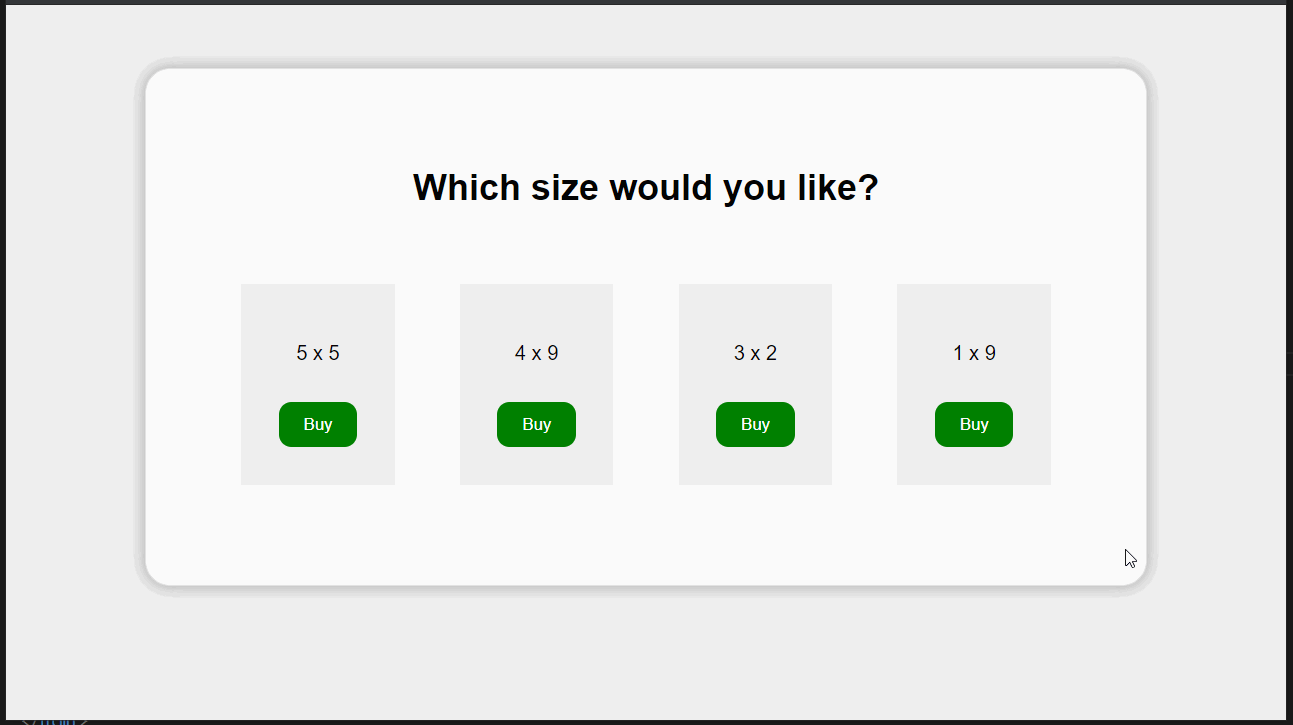
Next Step
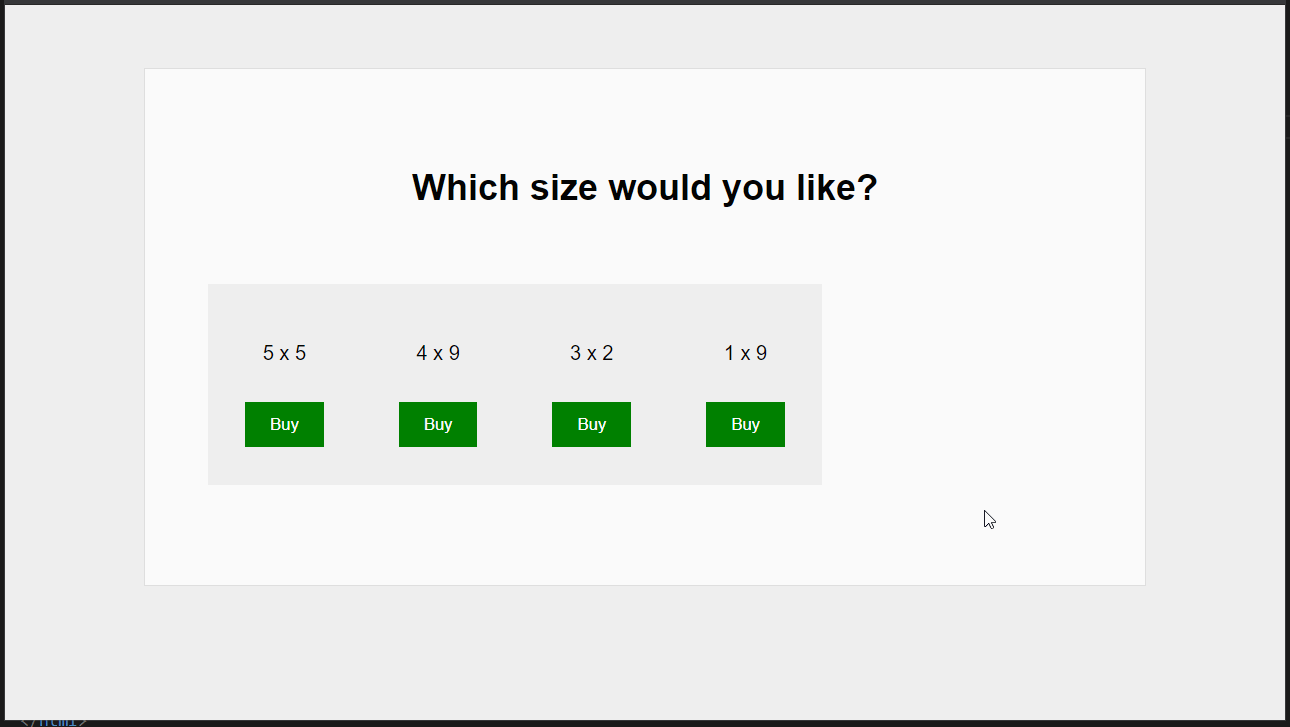
Now that you’ve got the generic structure down, let’s center our question container and use flexbox to get the options horizontally next to each other.
Try putting this property on the parent of the elements you want next to each other:
display: flex;
How can I center something in CSS?
Centering can be tricky in CSS!
If you want to center an entire block-level element (like a <div> or a <p>) first make sure it has a width set on it. If you don’t set a width, it will take up the entire width by default and you won’t see a difference when you center it.
Then set the left and right margins to auto on the block-level element. One common way to do that is like this:
margin: 0 auto;
That sets the top and bottom margins to 0, and the left and right margins to auto.
If you want to center an inline element (like an <img> or a <span> or just some text), set the text align to center on the parent of the inline element. Like this:
text-align: center;
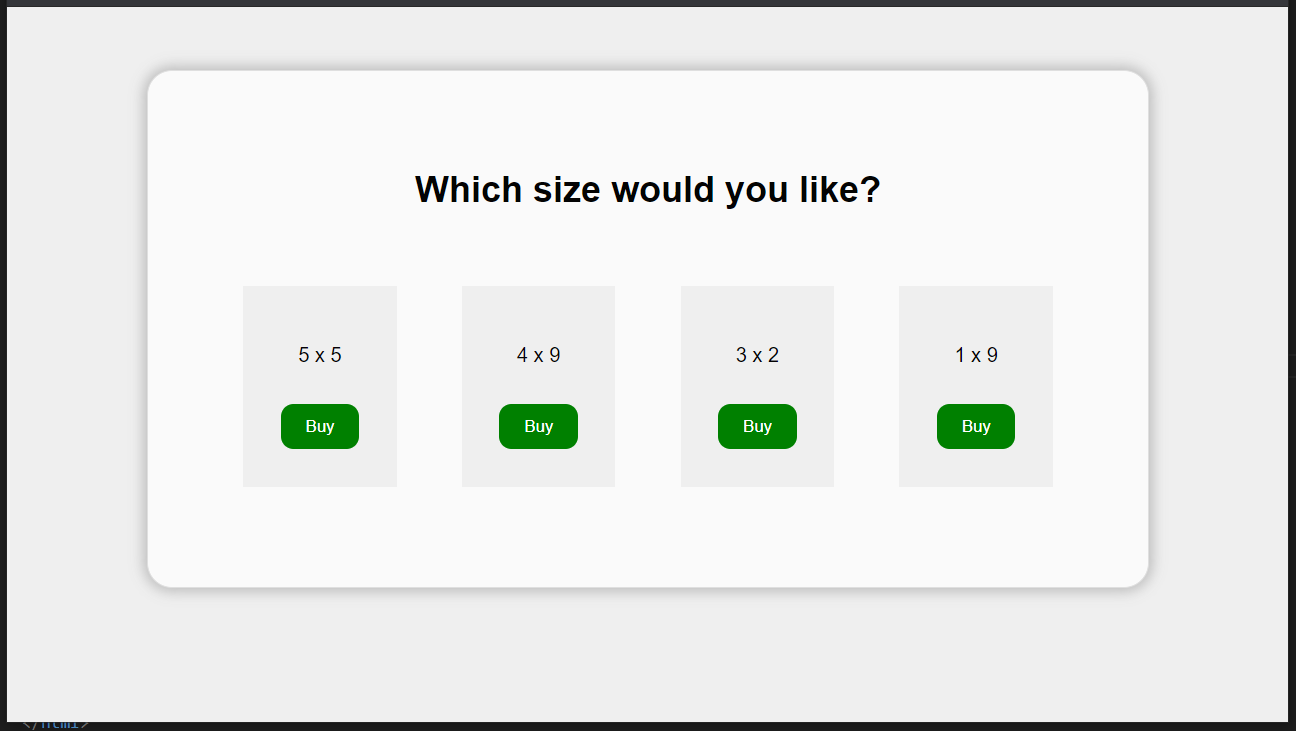
Finishing Touches
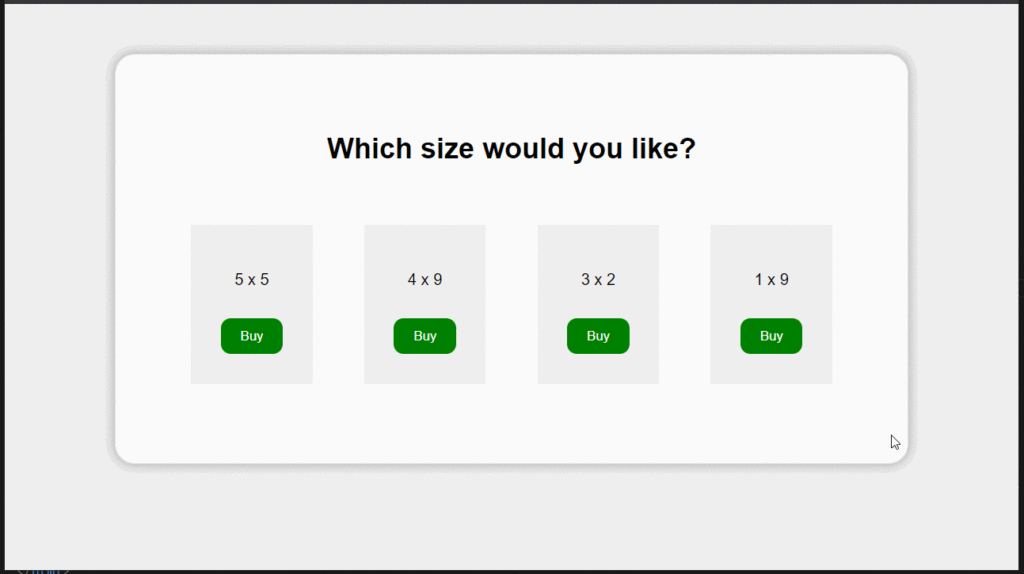
Let’s make this page a bit more responsive. A responsive page responds to changes in the size of the window and looks good at all sizes. Let’s also give the buttons a hover effect, and add some rounded corners and shadows.
After that, your page will hopefully look similar to our initial target:
Finishing Touches: Hints
How can I set a width but allow it to resize when the window gets smaller than that width?
Rather than setting the width, set the max width. Like this:
max-width: 700px;
Howcan I tell flexbox how to space the items out?
Look into the properties you can use with flexbox. CSS Tricks has a great guide on this.
Just tell me how to space them, dang it.
You can set the justify-content property on the parent. I won’t tell you what to set it to, try looking through the options in CSS Tricks’ Guide
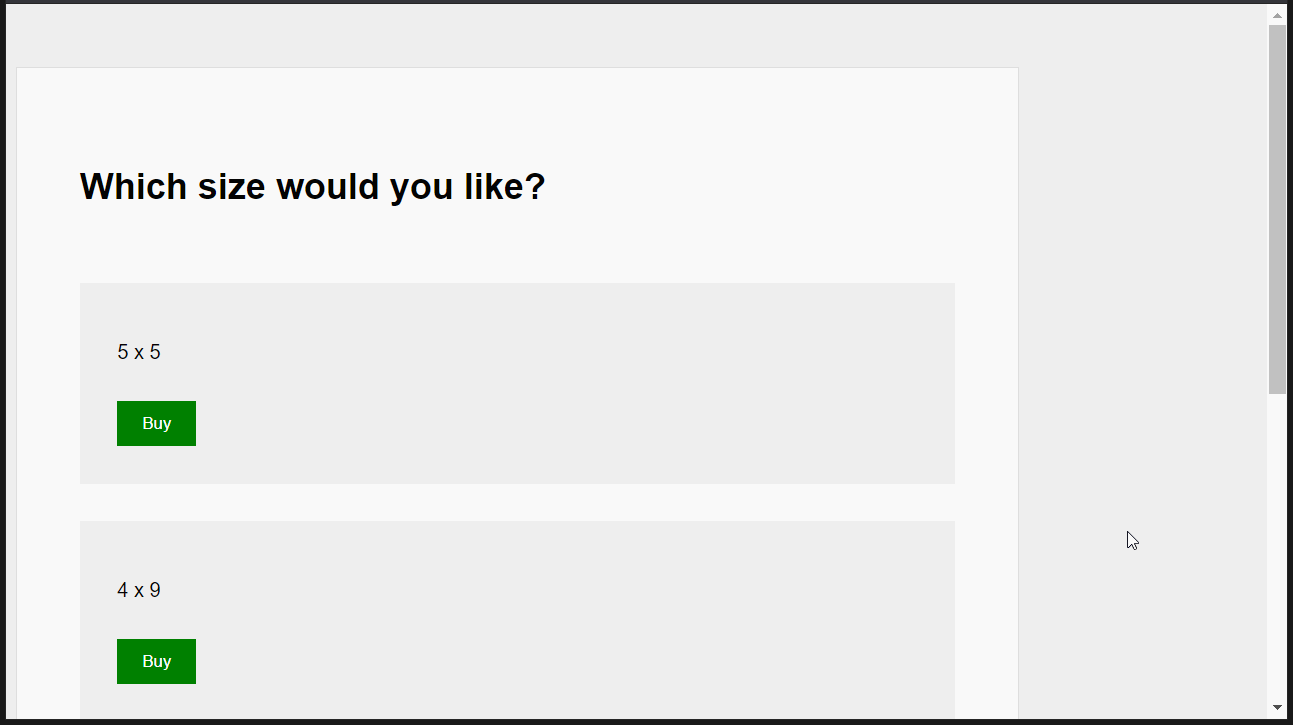
How do I getthem to wrap when the window gets very small?
I think you already know what I’m going to say. Look into the properties you use with flexbox. CSS Tricks has a great guide on this.
Just tell me how to wrap them, dang it.
You can set the flex-wrap property on the parent. I won’t tell you what to set it to, try looking through the options in CSS Tricks’ Guide
How can I round the corners with CSS?
There’s a border-radius property that sets how round the corners are. It works even if there is no border set. Google it to learn more about how to use it.
How do I get the shadow to show up all around the outside?
There are many ways to tweak shadows in CSS. MDN Web Docs has some examples. You’ll want to do some trial and error until you get a look you like.
How can I change the styling of the button when it’s hovered over?
CSS has a type of selector called a pseudo class selector. One of them might be helpful! (Spoiler: It will be)